The Mint Themes Event Management System

For our theme bundles, it was very important to get event management right. Making sure that your users see the right events at the right time, and in a beautiful way, is both a science and an art.

Creating recurring events is one of the biggest needs for churches, who often run events on weekly or monthly basis. That’s why we made sure our event management system included the ability to post recurring events, which is a huge time saver!

When an event has passed, it is automatically hidden from your website. This removes a whole pile of work for you, and also ensures your users only see event information that is valuable to them today.

We developed our own Event management plugin, and a separate display layer plugin to go with it. These plugins, like all of our plugins, can be used with any theme, and are part of how we prevent theme lock.

Creating Events

Event creation is done through our Event Management plugin called “MP Events”. This allows you to post new events right from your WordPress dashboard. Simply go to “Dashboard” > “MP Events” > “Add New”.

The Mint Themes Sermon Management System

The Sermon Management system we’ve built into our church themes here at Mint Themes has been designed with a lot of planning and intentionality to ensure it works for our users both today, and in the long run.

Adding new sermons is easy

To add a new sermon, you’ll simply log into your WordPress dashboard and click on “Sermons” > “Add New”. Then, just fill out the sermon details, and the rest is handled for you by our sermon plugins. You can read our in-depth documentation to know everything about this. Click here to read it!

The rest is automatically handled

There are 2 main parts to our sermon system:

  • The Sermon creation side
  • The Sermon display side

The Sermon creation side

This is the portion which allows you to easily log in and add your sermons, right in your WordPress dashboard. To add a new sermon, you simply log into your WordPress dashboard and click “Sermons” > “Add New”.

But the really cool part is that you can use any of the major Sermon Management plugins, including these:

So if you are using one of these plugins and you’re looking for a new theme, your existing sermons will automatically fit into any theme from Mint Themes, and will automatically look amazing.

The Sermon display side

With a Mint Themes church theme, sermons will get displayed on your website using our sermon display plugin called “SermonGrid”. SermonGrid integrates with those major Sermon Management plugins we mentioned, and provide some really cool ways to view your sermons.

Advanced on-the-fly filtering

SermonGrid features really cool filter buttons which allow your sermons to be filtered by Speaker, Sermon Series, Topic, and more, and all without ever needing to refresh the page.

Here’s a screenshot of it from our Restore Church Theme Bundle:

The filtering system in the Mint Themes SermonGrid system

Standardized Sermon Display

Clicking on a sermon in the grid opens a beautiful pop-up modal displaying the sermon video/audio directly beside the sermon notes. It has some other really useful functionality for your users as well:

  • Podcast Subscription button (iTunes, Google Podcasts, and more)
  • PDF download button
  • MP3 file download button
  • Other Sermons in this Series switcher

Church Theme Documentation

Installing the theme bundle

Installation requires only 1 single click, even though there are a whole bunch of plugins and demo content that will be installed for you! (These plugins are what prevent “theme lock”).

Once you’ve downloaded the zip file for the theme bundle, in your WordPress dashboard go to “Themes” > “Add New” > “Upload”. There, browse to the zip file you downloaded and select it. Once it has completed uploading, click the “Activate” button.

The “1 click” install begins.

This will reload a page asking for a license key. Paste in the license key you received with your purchase here to continue the installation. This single click will now install more than a dozen helper plugins we’ve created, and also set up all of the pages and templates you saw in the theme demo.

You will see an animation of gears on the page asking you to wait. This can take about 5 minutes so give it about that long to complete the process. It’s doing a ton of work under the surface and saving you a lot of set-up time!

Once completed, you will see a success message telling you to view your new website.

To add your own logo, go to “Dashboard” > “Appearance” > “Customize” > “Header Area” > “Logo”. Here you can upload your logo and play with the size it displays at by setting the width and height options.

Customizing the nav menu

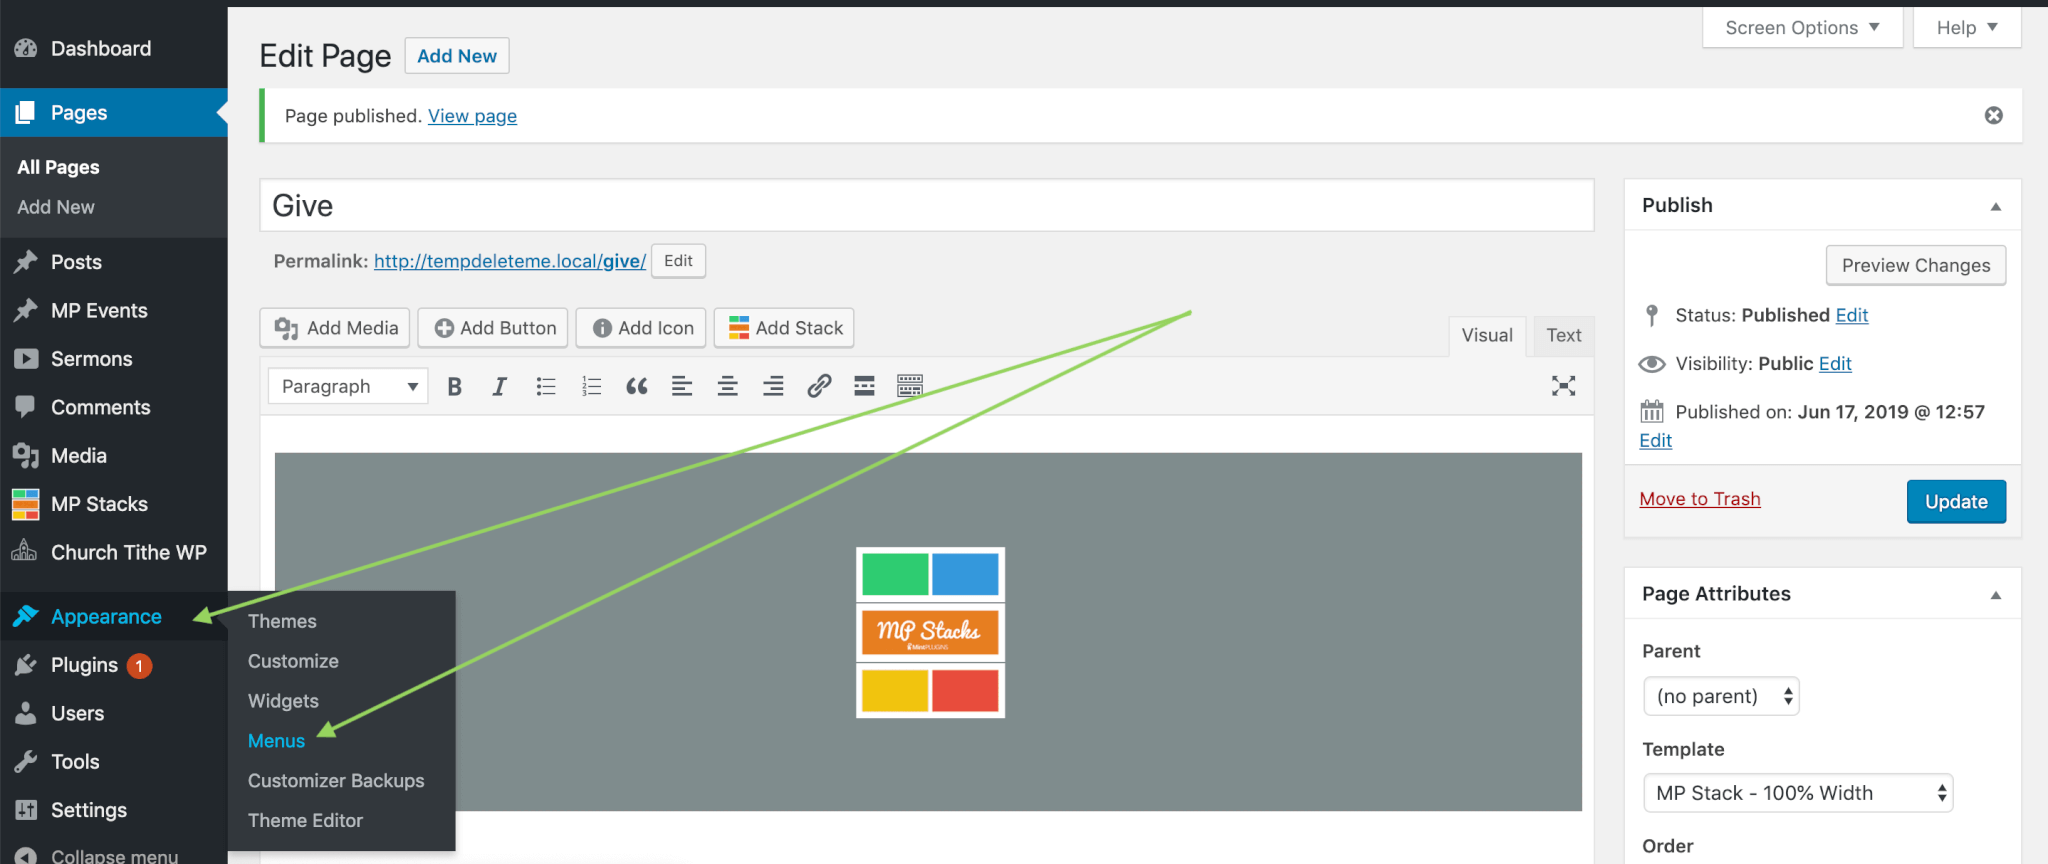
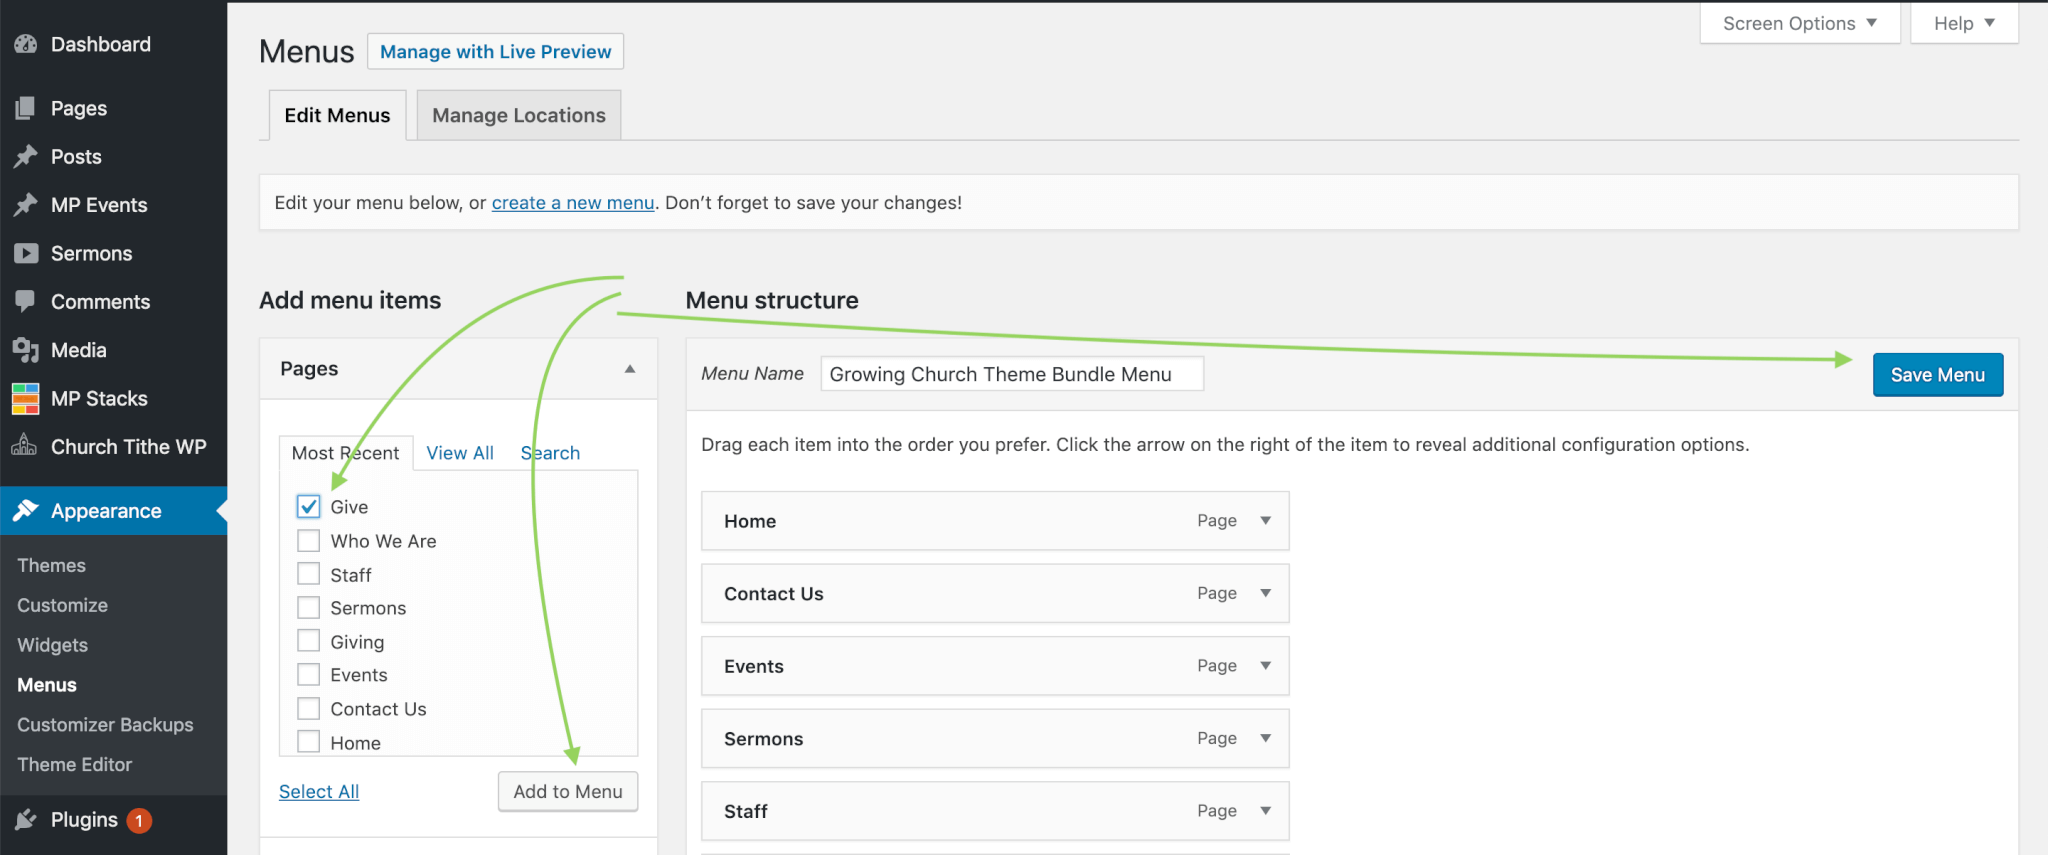
To add, delete, or re-arrange items on the navigation menu, go to “Dashboard” > “Appearance” > “Menus”. There, you can drag and drop to add or remove items from your menu.

If you’d like to customize the design of the nav menu, go to “Dashboard” > “Appearance” > “Customize” > “Header Area” > “Navigation”.

Customizing the site-wide design

To customize design things used across the entire theme, go to “Dashboard” > “Appearance” > “Customize”. Here, you’ll see a range of options allowing you to control things like Google Font used by default, button colors, font colors and more. Those options in particular are found in the options section called “Body Area”.

Keep in mind that these settings are used as a default “fall-back” for every item on every page. If a specific style has been defined in the brick-specific settings, these defaults will not be used, as they are overridden by the Brick Specific style settings. See the section called “Customizing a specific section’s design” for more.

Customizing a specific section’s design

Each page template is made of sections called “Bricks”. You can completely customize any Brick by double clicking on it. This will open the “Brick Editor”.

Each “Brick” is comprised of 3 main parts:

  • The background of the brick
  • The 1st Content-Type of the brick
  • The 2nd Content-Type of the brick

You can control everything about the Brick’s background in the area labelled “Brick Background Settings”.

You can choose 2 content-types to display within the Brick. When you do, the controls for those content-types will display at the bottom of the Editor. Each Content-Type has unique controls which allow you to determine exactly how it will be displayed.

For example, the “Image” Content-Type allows you to easily display an image. You can set the maximum width you want it to be displayed at (it will automatically shrink smaller on mobile if needed).

You can control the general layout options for each Brick in the section labelled “Brick Size Settings”. This allows you to determine the height of the Brick, and more advanced control over how the Content-Type are laid-out. Typically these advanced controls are not needed, as the automatic defaults are designed to create balanced layouts across all devices.

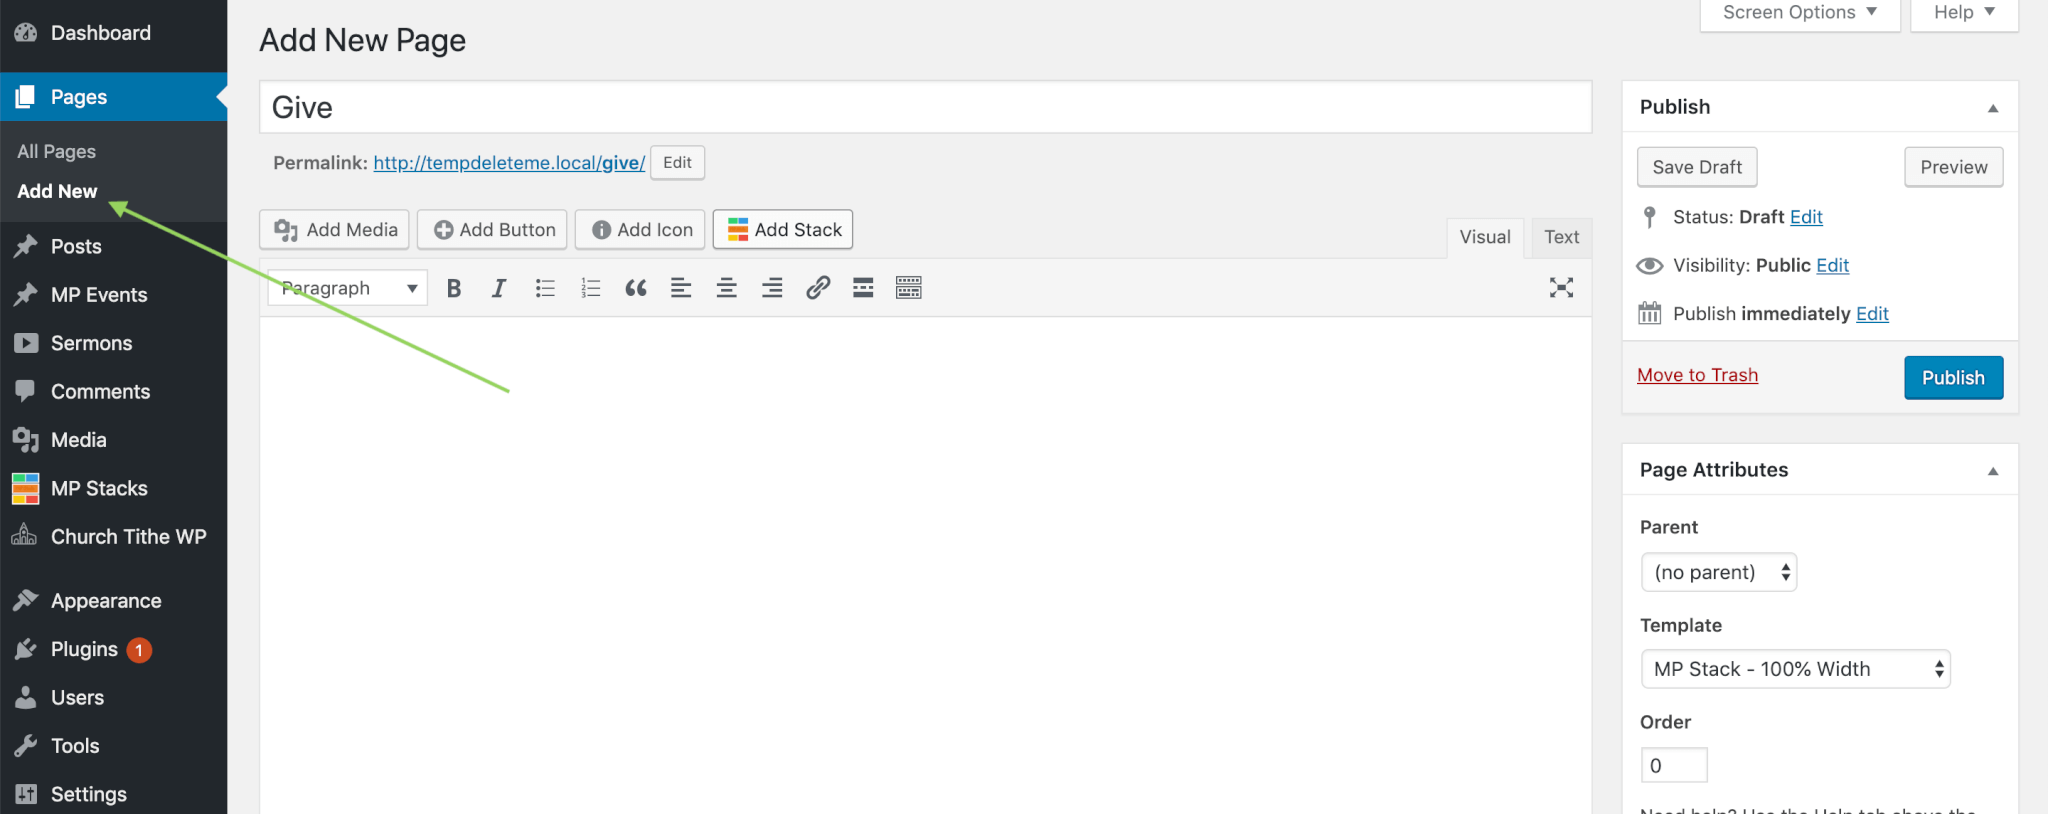
Creating new pages using the theme’s templates

If you’d like to create a brand new page for any purpose on your website, you can use the built-in page templates as a starting point for that page’s design.

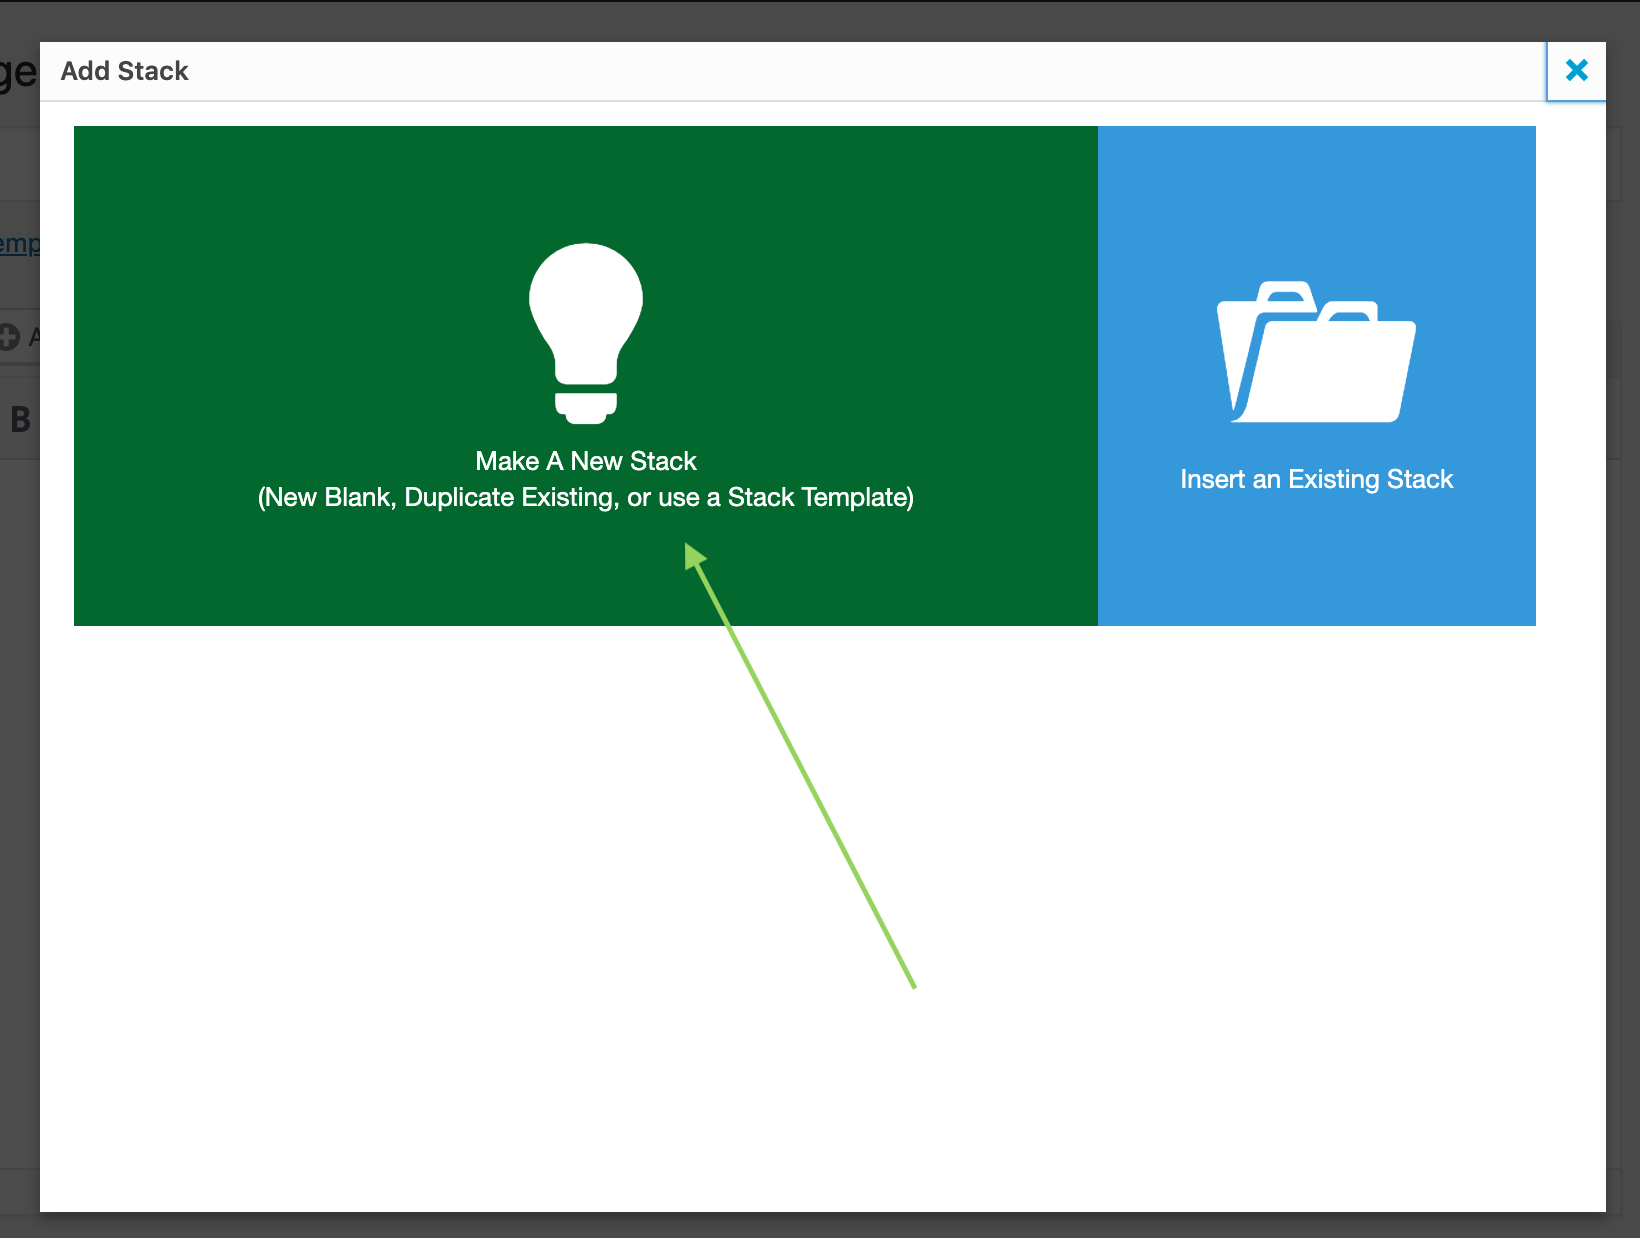
Go to “Dashboard” > “Pages” > “Add New”. From here, in the text area either type “/mpstack” (if you’re using Gutenberg) or click the “Add Stack” button (if you’re using the Classic Editor). Choose to:

“Create a New Stack”.

You will now be presented with some options for your new page template, which is called a “Stack”.

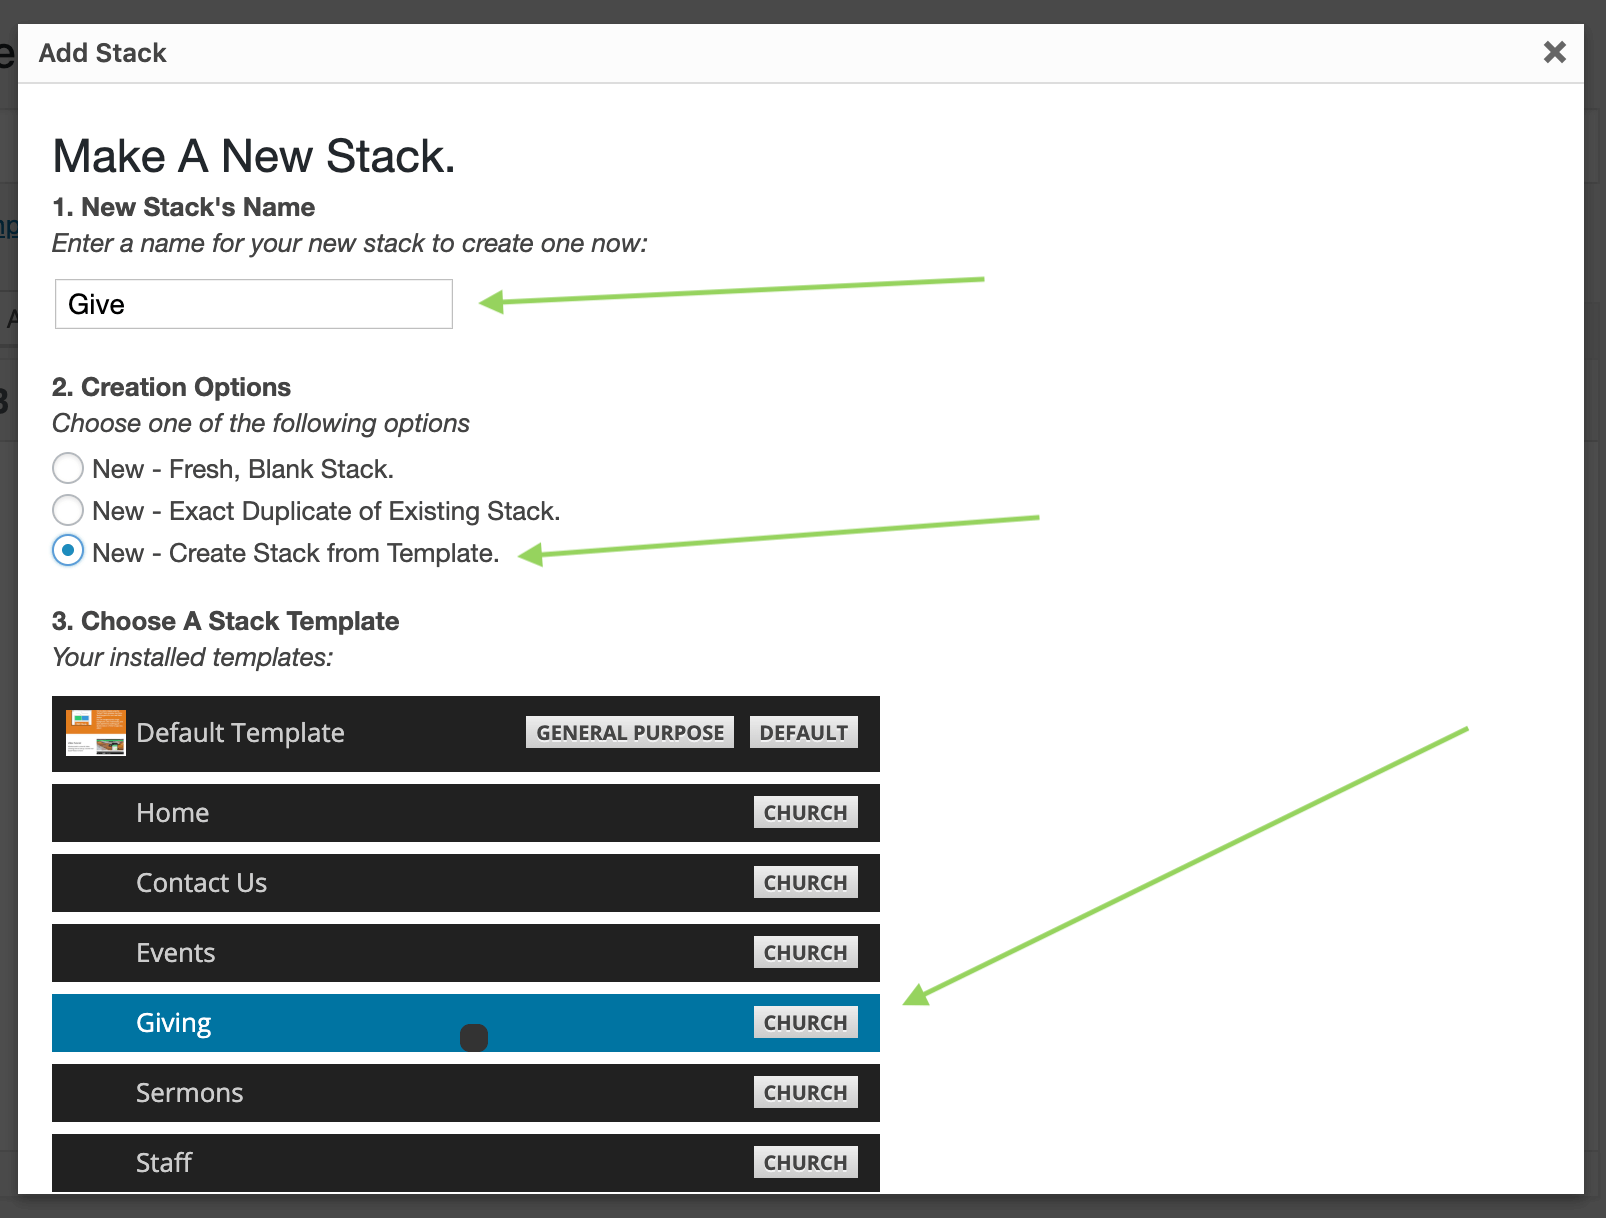
You will want to choose the 3rd option called

“New – Create Stack from Template.”

You will now see a list of the page templates included with your Theme Bundle. Choose the one you want to use as a starting point, and it will be generated for you, and placed on the page. Now, publish the page and view it.

You can now start editing the brick on this brand new page to be anything you need. For more details on how Brick Editing works, see the section titled “Customizing a specific section’s design”

Duplicating any page section (or “Brick”)

Duplicating and re-using a page section can be a useful way to speed up the creation of a new page. For example, if you’re making a “Staff” page, you might want to duplicate a page section focused on a person, so that you can add another person below!

Open the Brick Editor for the brick you wish to duplicate. Scroll to the very bottom of the Brick Editor. Notice the icon at the bottom right, which is a square with an arrow coming out the top right. Click on it.

In the pop-up which appears, click on “Export this brick”. This will download a file containing the code for this brick. Open that file in a text editor, and copy all of the text inside it.

Now, close the Brick Editor for the brick you just exported. Now click “Add Brick After” to add a new Brick. Give the brick a title, and then scroll down to the bottom right again. This time click “Import a Brick”, and paste in the text you copied. This will create a complete duplicate of the original brick, which you can now completely customize.

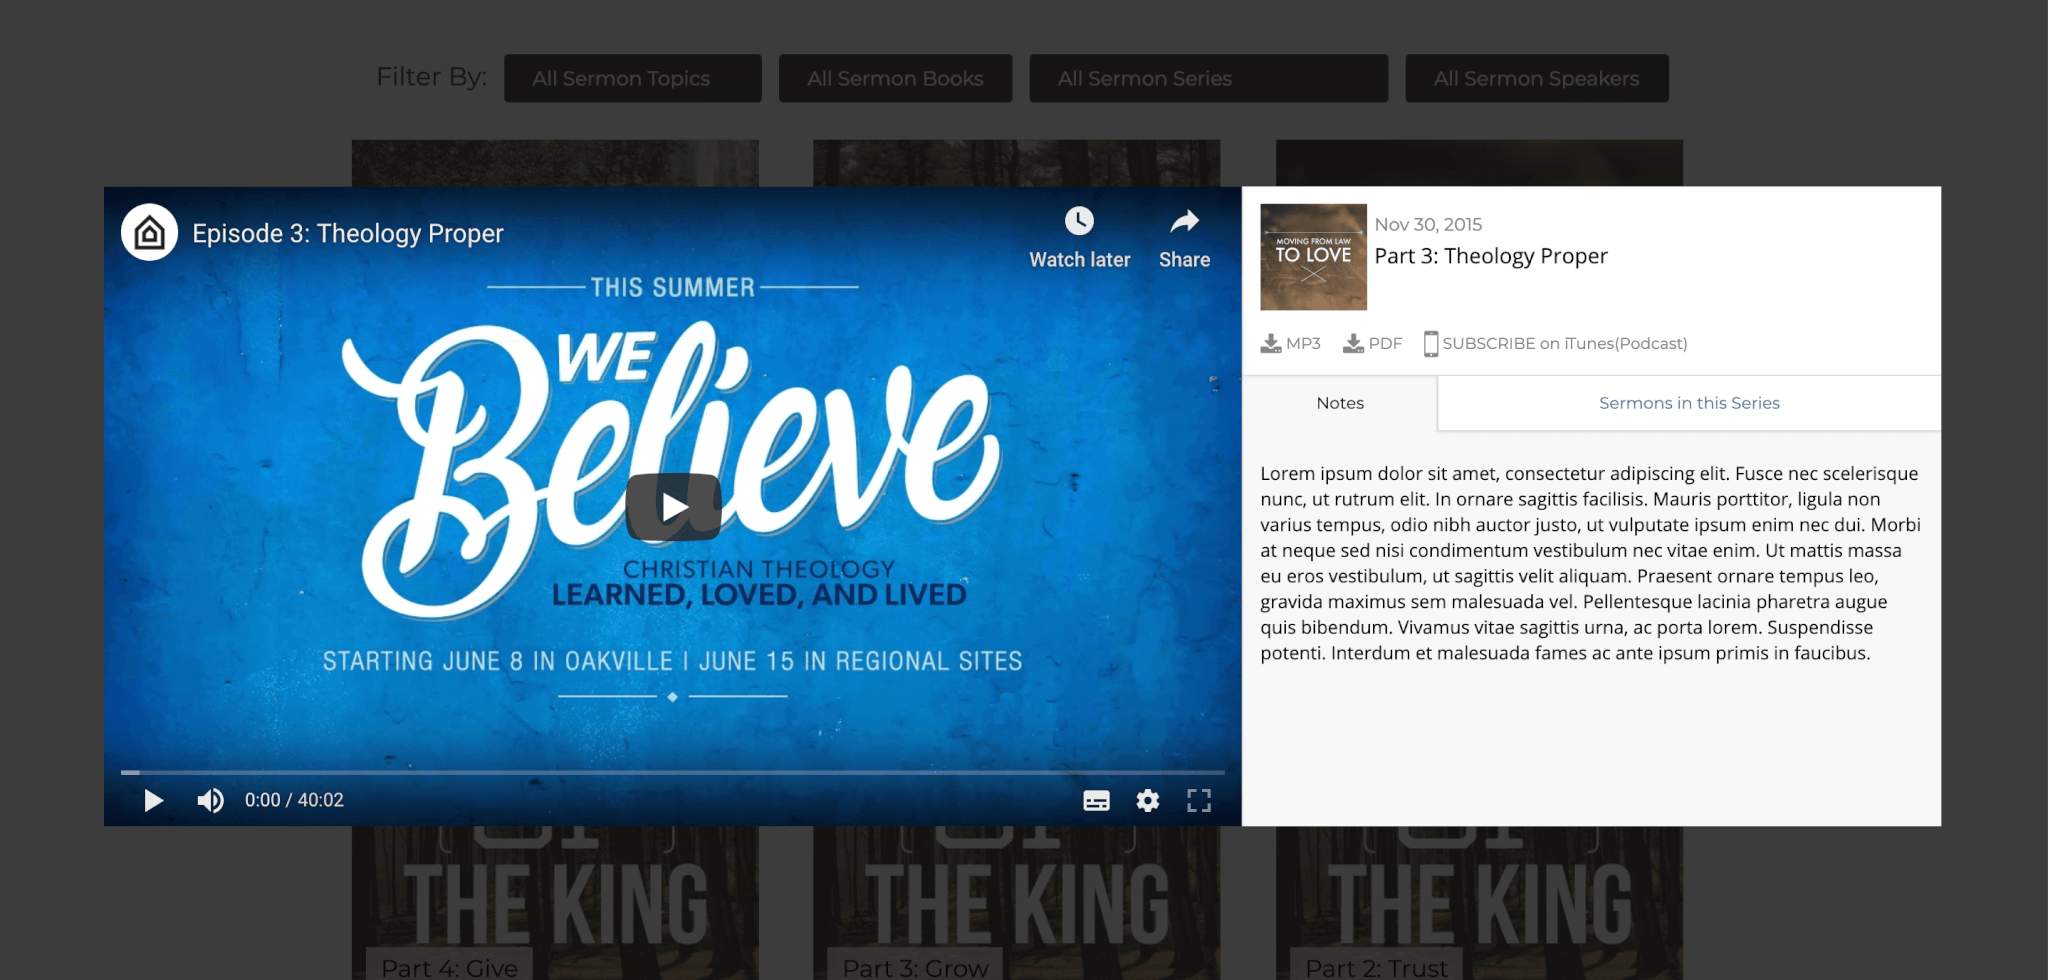
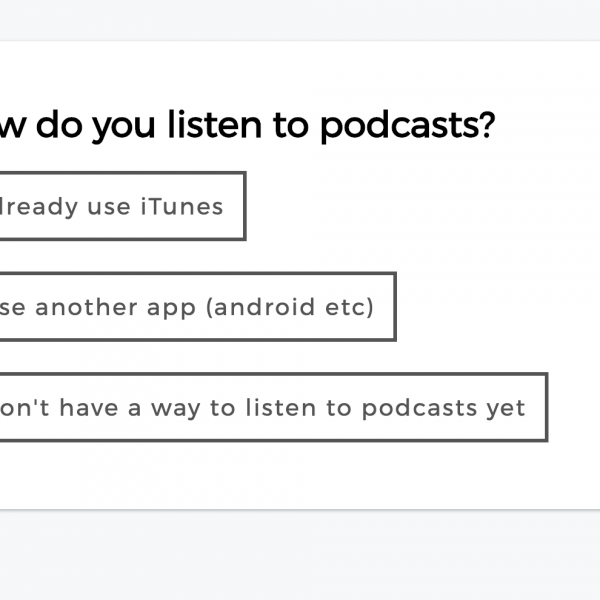
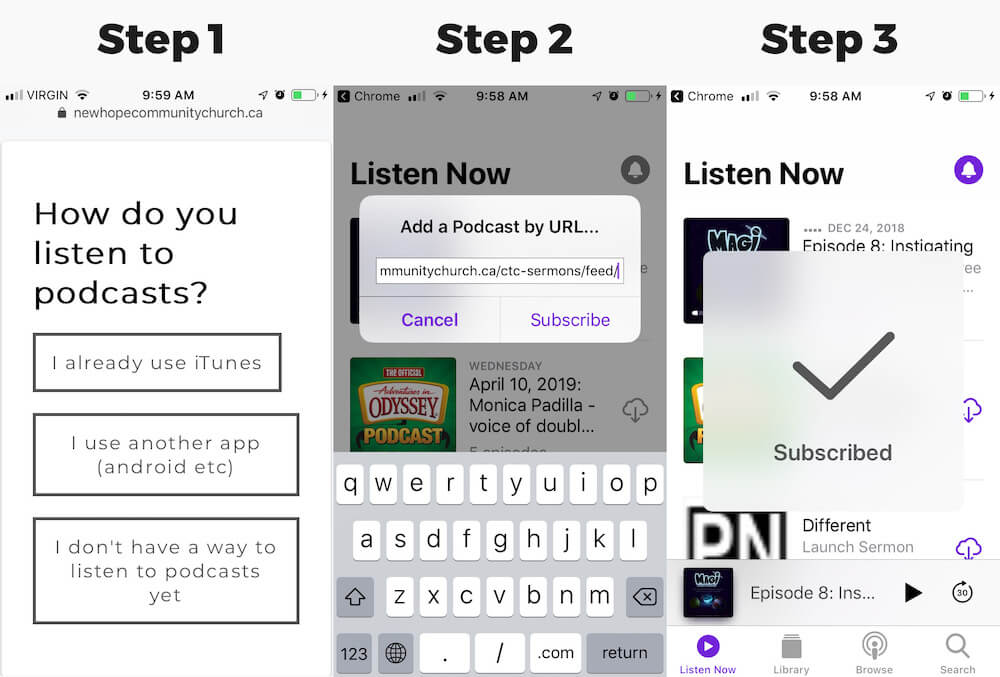
Adding/Managing Sermons

To add a new sermon go to “Dashboard” > “Sermons” > “Add New”. Give the sermon a title, and if you have sermon notes, paste them into the body area. Note that it is not recommended that you attach the video or audio in the body, but rather, use the dedicated area for that (see below).

Adding the sermon image

Scroll to the very bottom right of the Sermon Editor and click on “Add Featured Image”. Upload the image to use for the sermon when it is displayed to your users. If you don’t have an image to use, try using a free one from unsplash.com, or follow our guide to make awesome images easily!

Attaching the sermon audio and video

To add your sermon’s audio file, first make sure that it is in an MP3 format. Browsers require this over other formats. Then, find the field labelled “Audio” and upload your MP3 file.

To add a YouTube or Vimeo video of your sermon, find the field labelled “Video” and paste the embed code for your sermon from YouTube/Vimeo/Etc.

Attaching other details about the sermon

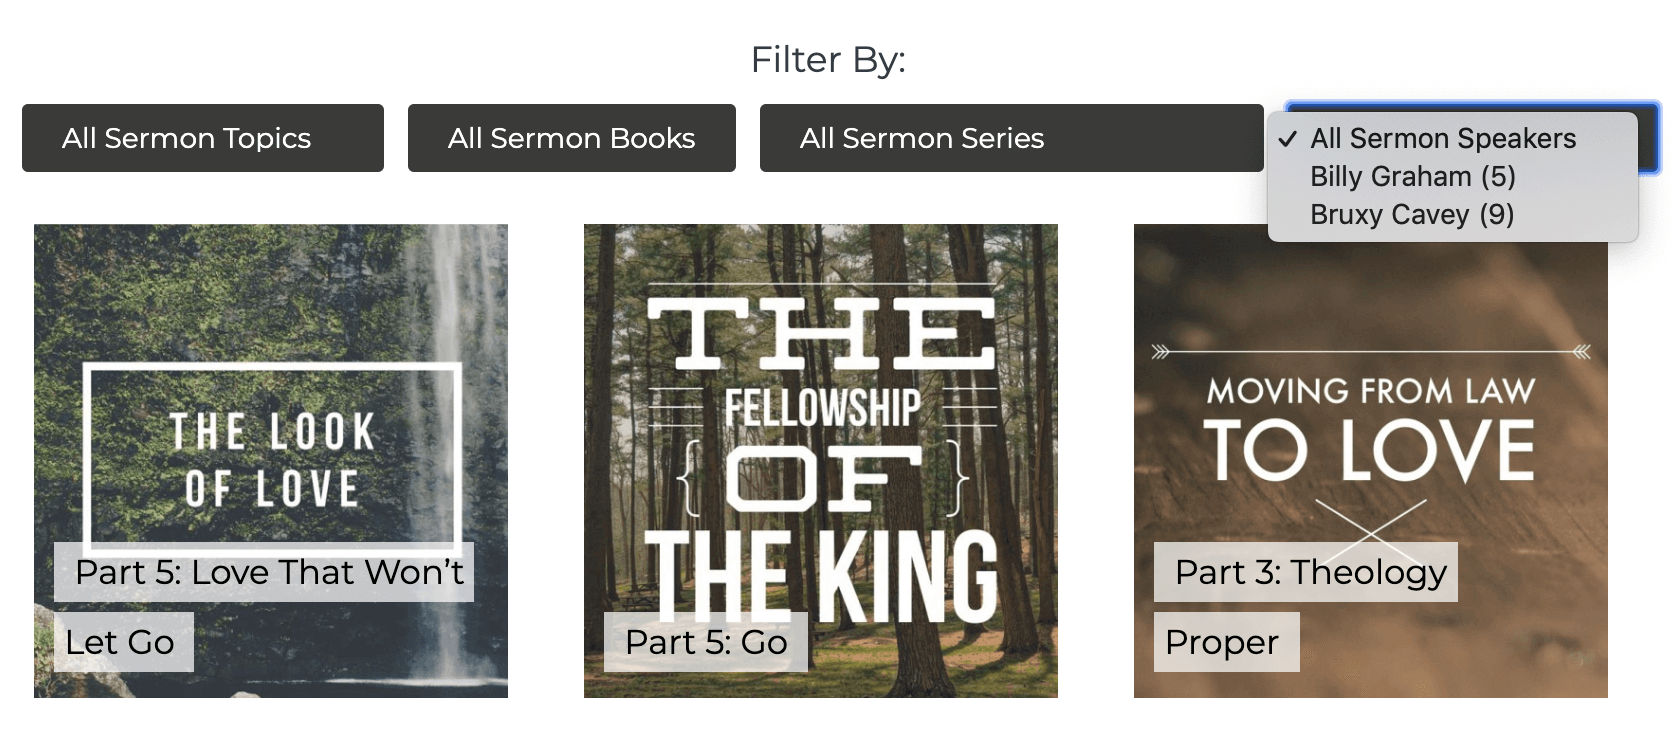
You can tag the sermon with important details like the Speaker, Books of the Bible used, the series (if it was part of a series). All of this is done on the right side of the screen. This is an important part of making your sermons easy to find for your users.

Lastly, publish the sermon. It will now display on your sermons page.

Deleting Sermons

To delete a sermon, in your WordPress dashboard click on “Sermons” > “All Sermons”. All your sermons will now be listed. Beneath any sermon you wish to delete, move your cursor over the sermon title and a “delete” option will appear beneath the title. If you want to bulk delete many sermons at once, use the checkbox to the left of the Sermon title, and then choose “delete” from the option at the top labelled “Bulk Actions”.
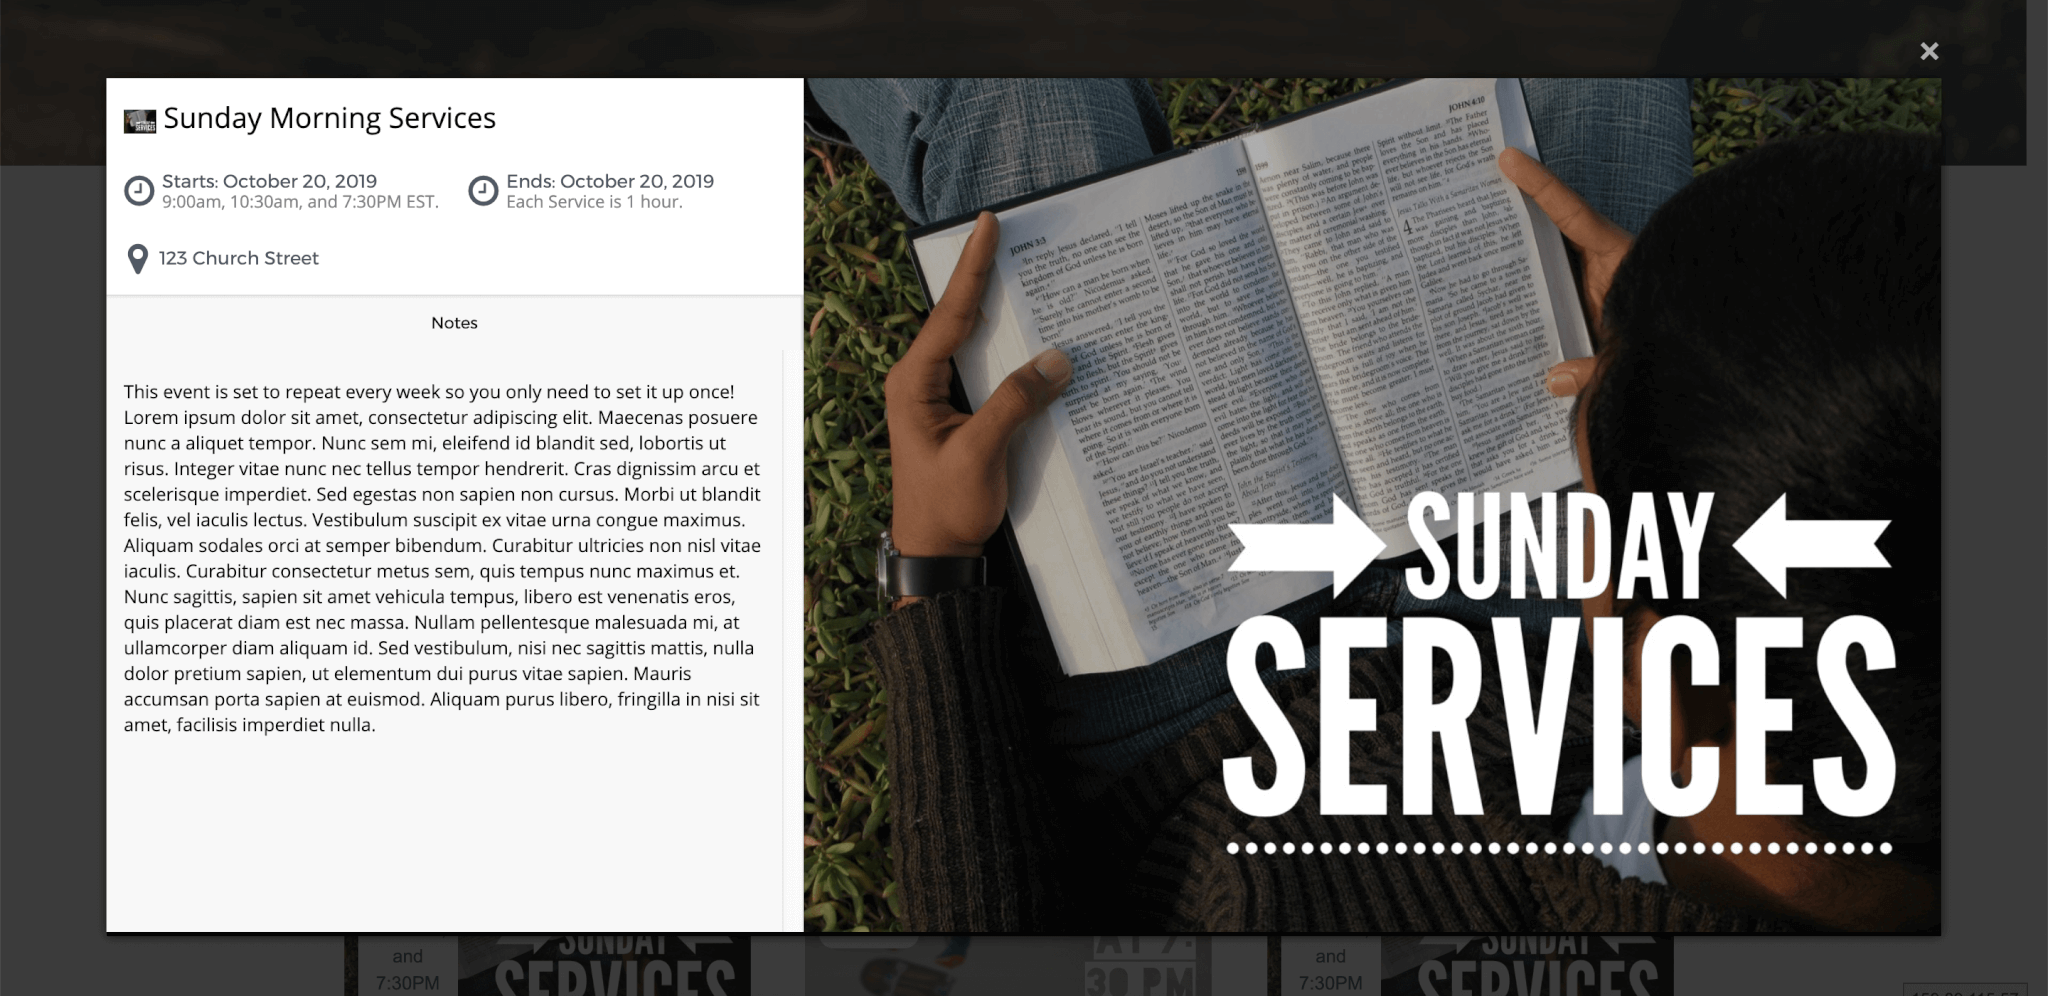
Adding Events

Go to “Dashboard” > “MP Events” > “Add New”. Type in the name of the event. In the body area put some details about your events.

Set the event image

Scroll to the bottom right and click on “Set featured image”. This image will be used to display your event. If you don’t have an image to use, try using a free one from unsplash.com, or follow our guide to make awesome images easily!

Set the event details

Scroll down to the bottom section called “Event Data” and set the following values:

  • Event Start Date: This is the date the event begins. It must be entered in a very specific format:
  • Event Start Time: This can be anything you want, but should describe the start time of the event.
  • Event Repeat: If this event repeats automatically, set this option to the corresponding value (like Daily, Weekly, Monthly, or Yearly).
  • Event Repeat End Date: If the repeating event should only repeat for a certain period, enter the date when it should stop repeating here. Otherwise it will continue repeating infinitely, which is completely fine.
  • Address: Enter the address where the event is taking place.

Publish the event, and it will now show on your events page. Note that past events are automatically hidden. So if your event isn’t showing up, double check that the Start Date you entered is actually in the future, otherwise it will be hidden!

Event Frequently Asked Questions

What if I have a recurring event that isn’t daily, weekly, monthly, or yearly?

For these events we recommend creating a single event for each one. To help speed up the process, you can use the free “Duplicate Posts” plugin, which will allow you to duplicate events. This way you only need to change the start date for each duplicated event.

What are “Calendars” used for?

You don’t need to use Calendars, however, they can be useful for some churches. You can set an event to be part of a Calendar, which is just a way of grouping events together.

For example, you could add all Youth Group events to a “Youth Group” calendar, and only show that calendar on your Youth Group page. You could do that on your Youth Group page by setting a Brick’s Content-Type to be “EventGrid”, and then set that to only show the “Youth Group” calendar.

Setting up Online-Giving/Donations

Online giving is powered by the Church Tithe WP plugin, which makes it extremely simple for churches to accept tithes and donations via Stripe.

Go to “Dashboard” > “Church Tithe WP” and follow all of the steps to connect your Stripe account. Once connected and completed, your donation form will automatically be displayed on your Online Giving page.

Configuring your contact page

Browse to your contact page, which was automatically generated when you installed the theme. There, make sure to replace all references to the phone number and email address to your own by double-clicking on the Brick containing it.

Also, if your contact page has an email form, double click on it to open the Brick Editor. Then, under the Form’s settings, open the section labelled:

“Form Submission Actions”

There, set the Form Submission Action to:

Send an email containing the form data

Enter your email address as the place to send the form submission. When the form is submitted you’ll now get the contents of that form, and you can reply directly to respond to the person.

Frequently Asked Questions about the Contact Form

I am getting a lot of spam through the form. What can I do about that?

In the Brick Editor for the Contact Form under “Form Security” > “Google reCaptcha”, enable the option called “Secure this form with Google reCaptcha?“.

Google reCaptcha prevents bots from being able to submit your form. After enabling the checkbox, you’ll see a link to create your Google reCaptcha API key. Click it. There, click the “+” button and generate a “reCAPTCHA v2” key. Once generated, copy and paste the keys back into the Brick Editor.

I am not getting emails from my form, even though it was submitted! What can I do?

This is a common issue with WordPress in general, and emails it send (like the “Forgot Password” email). The solution is to route your website’s emails through a solid email sender. Follow this guide to get that set up.

How to add online giving to your Church Website

Online giving for churches has become important for almost all churches, as people prefer to take an automated approach to church donations. It’s become something we see a lot of requests for with users of our church themes for WordPress.

There is a plugin called Church Tithe WP which makes it very simple for all churches to accept online donations via credit card, and it includes recurring payments. It uses Stripe to process the payments and to automatically deposit the amount in your bank account. It’s free to install, and has pay-as-you-go pricing that maxes out at $199/year.

Setting it up

In this article, I’ll show you how to add an online giving page to your website if you use one of our church themes here at Mint Themes.

  1. Install the Church Tithe WP plugin by logging into your WordPress dashboard, and then clicking on “Plugins” > “Add New”.
  2. Search for “Church Tithe WP” and install + activate the plugin.
  3. Once activated, you’ll see “Church Tithe WP” in the left sidebar of your WordPress dashboard. Click on it, and follow the steps it provides to get the plugin set up with Stripe, which allows the payments to be deposited directly into your bank account.
  4. Now, we will create the page where giving can take place. Go to “Pages” > “Add New”.
  5. Call the page something like “Give” or “Give Online”, whatever works for your website.
  6. Click on “Add Stack” > “Make a new Stack”.
  7. Give the Stack a name like “Give” or “Give Online” to match the page it will be sitting on.
  8. Under “Creation Options”, choose “New – Create Stack from Template”.
  9. Under “Choose A Stack Template”, choose the template called “Giving”.
  10. Now that you have the Stack created and sitting on the page, click “Publish”.
  11. Great! Now we have a giving page all set up and ready to use. However, we also want to make it easy to find for your users. So now let’s add this new page to the navigation menu. Click on “Appearance” > “Menus”:
  12. Under the “Pages” metabox, select the page we just created called “Give”. Then click “Add To Menu”, and finally “Save Menu”.

That’s all there is to it! Now, you have a “give” page ready to accept credit card payments, directly on your website through Stripe. If you have any questions about this process, feel free to email us for help: support@mintthemes.com

Sermon Podcasting improvements to our themes

We just released an update to our SermonGrid add-on, which is used in our church themes to display sermons in a grid. There has always been an option there to “Subscribe to Podcast”, but we noticed it was causing some confusion for users, and so we have improved it.

Previously, it was coded to try and automatically open the podcast in iTunes. But that caused confusion for people who don’t have iTunes, because it simply opened the “feed”, which looks like a bunch of jumbled code. That’s not a great user experience if you don’t have iTunes. It also didn’t allow users to subscribe to your podcast using their podcasting app of choice very easily. Additionally, the Subscribe button only worked on Apple Laptops and Desktops. It did not work on mobile.

This update is intended to improve all of those rough spots when your users click the “Subscribe to Podcast” button for one of your sermons. Now, when clicked they will see a page which gives them 3 options for subscribing:

  1. Subscribe on iTunes
  2. Subscribe using another app
  3. If they don’t have a podcasting app they use yet, it sends them to a google search for podcasting apps, which is useful for deciding which app is best for them on their device.

Here’s a screenshot of that page:

New podcast subscribe options

Once you do the update in your WordPress dashboard, this page will automatically exist. There’s nothing you need to do to make it happen.

The subscribe process on iPhone also works much better now, as it opens iTunes automatically. Here’s a screenshot of that in action on iPhone:

iPhone Podcast subscribe flow

If you have any feedback on this, or thoughts of how it could be improved, or you’re just excited for the better experience provided by this change, let us know! Our hope is to always be making it easier and better for your users to interact with your website, while also keeping the amount of configuration required by site owners to a minimum.

See this change in action on our theme demo for the Restore Church Theme Bundle’s sermongrid page here:
https://demo.mintplugins.com/restore-church-theme-bundle/sermons/

Step-up your featured image game

Attaching great featured images to your WordPress posts is key to grabbing the reader’s attention. The featured image is what typically shows up when someone shares your post on social media sites like Facebook or Twitter. Not only that, but the featured image helps to create a “feeling” to go along with your content. It can be the difference between your site feeling professional and trustworthy, and it falling flat.

But if you’re not a graphic designer or a photographer, it can be difficult to come up with a great featured image. Paying for apps like Photoshop can also be quite expensive, and so is hiring a graphic designer. While those are great options for larger companies with a budget for it, there are other great ways to get amazing images for your content. Here, I’ll share a super simple and effective way to create compelling featured images to go with your content. I’ll also share a way to optimize them for your website, all without expensive programs like Photoshop. Ready? Here we go!

The WordSwag App for iOS and Android

This is by far the biggest time saving app I’ve found when it comes to generating eye-catching images to go with my content. You simply type in the title of your post, choose an image, and the app lays the text out beautifully on the image. If you don’t have a huge budget to hire a graphic designer, and you don’t have time to do designs like this yourself, you’re going to love this app.

WordSwag has specific groups of word layout styles to choose from, so you can likely find one that fits your brand’s style, or at least one that comes close. You can also punch in your site’s colors (using hex codes) to make sure everything really fits your brand.

*To be clear, I am not getting any kickbacks from the WordSwag app for writing this article. It’s just truly a great app that I use myself and think you’ll find useful as well. In fact, I created the image for this post using the WordSwag app.

Check out some of their previews and grab the app for your phone here: http://wordswag.co/

The full version of the app costs about $5, which is way less than hiring a single graphic designer.

Now, while WordSwag is awesome for creating the image itself, it exports images at around 2 megabytes, which is way too large to upload onto your website. It will kill your loading speed time to have images that large. Instead, your images should be well under 1 mb each. The lower the better. That brings us to the next step.

The TinyPNG website to optimize your images

Compressing and optimizing your images to reduce their filesize is a hugely important step in making sure your website loads quickly. Overcompress the image and it looks like garbage. Undercompress it, and it takes too long to load, resulting in people leaving your website.

The simple solution is a website called “TinyPNG” found at www.tinypng.com. It compresses images so well you can hardly notice they’ve been compressed. That is, until you look at the filesize drop. It can greatly reduce the filesize of your image.

So take the image you created with WordSwag, email it to yourself, download it, and then drag it into TinyPNG’s website to compress it.

Download the photo that was compressed by TinyPNG and upload it to your WordPress post as the featured image.

I hope these little tips will help you create better featured images for your WordPress posts!  If you have other techniques, websites, or ways of creating great images for your blog posts that you’d like to share, leave a comment and let us know!


How to add Google Analytics to your WordPress site without needing a plugin

Learning about the people who come to your website can be a very useful thing. It can help you realize what type of content your audience is looking for, and in turn help you better serve their needs. And while not every website is the type that requires this kind of data, if you’re running a more complex site, or just want to know more about your users, you might be interested in adding Google Analytics to your website.

What is Google Analytics?

By adding a bit of code to your website, you can allow Google Analytics to track and log detailed information about every visitor. Adding the Google Analytics tracking code to your website is pretty straightforward to do. And while there are plugins out there to help with this like Monster Analytics, the simplest way is to add a small function to your child theme.

If you aren’t sure what a WordPress child theme is or why it’s so important, we wrote a quick article about it called “Why having a child theme is the best thing you’ll ever do for your WordPress website”. As a sidenote, every theme from Mint Themes automatically creates and installs a child theme for you.

Add Google Analytics tracking code to your child theme

Back to the topic at hand, by adding the Google Analytics code to your child theme you won’t require any additional plugins. This can save you money, especially if you don’t require the additional complexity covered by the plugin mentioned above. If you’re just getting started, or you’re not a data-mining expert, the following code is the surest way to get going with Google Analytics quickly:

  1. Log into your Google Analytics account at https://analytics.google.com/analytics/web/
  2. After logging in, if you haven’t already created an “account” for your website in Google Analytics, click on the “Admin” tab from the left side menu and click “Create Account”
  3. Once your account is created, go to “Admin” > “Tracking Info” > “Tracking Code”. Keep this window/tab open so you can copy the tracking code later. 
  4. In your WordPress dashboard, with your child theme activated, go to “Appearance” > “Editor”, and make sure you are editing the “functions.php” file.
  5. Add this code to it:
  6. Replace line 10 with the code you will copy from Step 3 above.
  7. Save the functions.php file.
  8. That’s it! You’ve now added the Google Analytics Tracking Code to every page of your website.


Photo by Neven Krcmarek on Unsplash

Why (Properly) Plugin-Powered Themes are the Future of WordPress

Having a (Properly) “Plugin Powered” WordPress Theme is a major advantage to you as a website owner. We say “Properly” because, unfortunately, not all Plugin-Powered themes are created equally. At the end of this article, we’ll go over some of the things to watch our for with Plugin Powered Themes. But first, lets get to what makes them great!

More secure.

Plugin Powered themes (vs Themes that have all functionality “baked-in”) are more secure because each plugin can focus on its own task without worrying about a lot of other things. The development process is much more streamlined. This makes applying a security update much quicker for us as the developer. Also, updates are all available right in your WordPress, which is good because you won’t need to hunt for updates and manually install them. Your website can always be totally secure because new threats are immediately dealt with by new updates being applied. To apply new updates you just need to log into your WordPress dashboard and go to “Dashboard” > “Updates”. This is a good thing to check every time to you log in to your WordPress.

Avoid “Theme Lock”.

Having a theme that is “Plugin Powered” also makes it easier to move to a new theme in the future. This is because plugins can be used alongside themes – but you can only ever have one theme active at a time. If a theme’s functionality is “Baked In”, you lose that functionality when you change to a new theme. This is known as “Theme Lock” and plugins completely solve this issue.

Things to Watch Out For.

As we mentioned at the start of this post, there are some things to watch out for when buying a WordPress Theme that is Plugin-Powered – especially from places like Theme Forest. When purchasing a “Plugin Powered” theme, you want to make sure that you are getting updates for all of the plugins that power the theme – otherwise you may be at risk for a hack when your plugins aren’t properly updated. If the theme seller isn’t offering updates for the plugins as well as the theme, it isn’t worth buying. Our Plugin Powered Themes all come with updates for the plugins because we actually make our own plugins. This is a very important thing to remember so that you don’t get hacked in the future.

Also, before you buy a Plugin Powered Theme, make sure that the plugins actually come with the theme and are automatically installed for you. If they are not included, come with updates, and don’t automatically install, don’t buy the theme unless you are willing to purchase each plugin separately, install them all yourself (which can take hours and be frustrating), and renew licenses for them all manually as well. This can all be a huge headache.

Fortunately, our Plugin Powered themes come with the plugins included, updates are included, and auto-installation is included. This makes the entire setup process very quick and simple and is the future of WordPress theme-ing in the future.

If you’d like to check out our Plugin Powered Themes, head over to our Plugin website where they are available:

https://mintplugins.com/themes/


Product Launch WordPress Themes

Launching a new product online is both fun, exciting, and also a lot of work. If you are launching a new product, you know just how hard it is to get people to pay attention to your new product – and to have a great looking/working website to capture their excitement about your new product.

Videos are a great way to showcase a new product and how it works. But it’s also important to feature that video properly on your website – along with well-thought-out feature sentences that are small enough for the reader to digest – while being long enough for the reader to learn valuable things about your product.

If it’s time for you to get your website built for your new product launch (whether you’re doing a Kickstart campaign or an Indie Gogo – or any other crowd-funding campaign), or if you’re ready to launch and sell, we’ve built WordPress Themes specifically for launching new products. They are complete with all of those well-thought out sections designed to capture and keep your user’s attention while helping them learn new things about your new product.

Here is a (growing) list of our best Product Launch WordPress Themes:


#1. The Launchstack Theme Bundle:

Launchstack1

Video Backgrounds WordPress Plugin

A new trend on the web has been to show really nice-looking videos as backgrounds instead of images. We’ve just built a plugin that does exactly that and it’s extremely easy to use. It gives you the ability to use any public video on YouTube or Vimeo, or even upload your own video file to your WordPress media library and use it!

To get the plugin head over to our plugin website and check it out:
Video Backgrounds WordPress Plugin